Improve AWS security: protect your keys with ease
As a DevOps engineer, I love to work with the AWS Command Line Interface (CLI) to control various AWS resources in an (half-)automated way. To be able to do so it is necessary to store access keys on my local machine. These access keys (access key ID and secret access key) are used to authenticate with AWS whenever I run a command with the help of the AWS CLI. I do my very best to keep my local machine secure, but nevertheless, I don’t think it is a good place to store my keys to AWS without any further security arrangements.

Michael already wrote about using MFA (multi-factor authentication) to add another layer of security in his blog post Your single AWS account is a serious risk. AWS supports MFA when logging in with the Management Console and for the use of the CLI as well. If you configure MFA for your IAM user, the access key is no longer sufficient to authenticate. Instead, the access key and a one-time password generated by a hardware token or a mobile app are needed. So it is a much smaller disaster if someone can steal the AWS keys from your local machine because these keys won’t unlock all your AWS accounts.
Using MFA with the AWS CLI is easy
1. Restrict access for IAM user
Attach the following IAM policy to an IAM user (or an IAM group).
{
    "Version": "2012-10-17",
    "Statement": [
        {
            "Sid": "1",
            "Effect": "Allow",
            "Action": [
                "sts:AssumeRole"
            ],
            "Resource": "*",
            "Condition": {
                "Bool": {
                    "aws:MultiFactorAuthPresent": "true"
                }
            }
        },
        {
            "Sid": "2",
            "Effect": "Allow",
            "Action": [
                "sts:GetSessionToken"
            ],
            "Resource": "*"
        }
    ]
}
With this policy the user is only allowed to perform the following actions: using STS to get temporary AWS keys and assuming an IAM role. But assuming a role is only possible after the IAM user is multi-factor authenticated.
Note: it is also possible to restrict the roles the user can assume. This is necessary if you are using multiple IAM roles within your AWS account or if other AWS accounts grant you to assume their roles.
2. Configure MFA for IAM user
It is necessary to configure an MFA device for the IAM user. It is possible to use the Management Console to do so. Select the IAM user and search for the Manage MFA device button. A click on this button will open a wizard that will guide you through the process of configuring an MFA device for the IAM user.
3. Create an IAM role
You need to create an IAM role next as the IAM user will need to assume a role to be able to control AWS resources from now on.
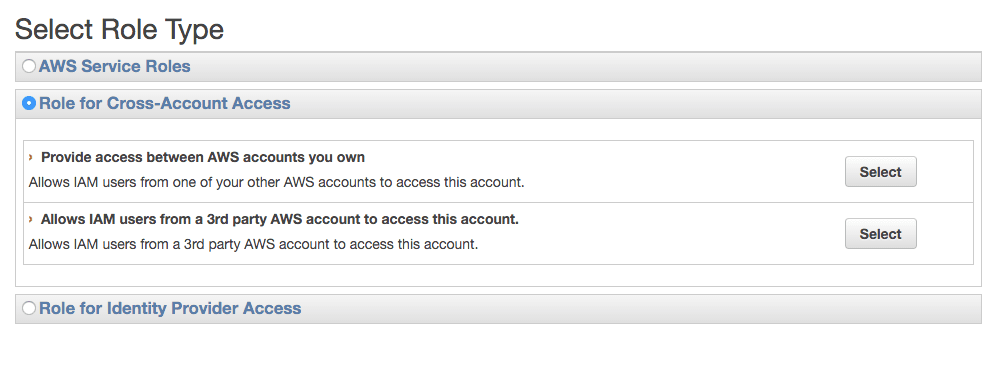
When using the wizard of the AWS Management Console to create a new IAM role you are asked to select a role type. Choose *Role for Cross-Account Access** and select *Provide access between AWS Accounts you own”.

Enter your Account ID and enable MFA in the next step.

Create an IAM role and attach an IAM policy granting access to the needed AWS resources. For DevOps engineers, it might be a good idea to use the managed IAM policy called PowerUserAccess.
4. Configure AWS CLI
You need to install and configure your AWS CLI first. It is now necessary to configure the AWS CLI in a way it uses the IAM role you created in step 3 and the MFA device you configured in step 2.
AWS access keys are stored under ~/.aws/credentials. Usually this looks similar to the following listing.
[default]
aws_access_key_id = ...
aws_secret_access_key = ...
The configuration for the AWS CLI is stored at ~/.aws/config and should look similar to the next listing.
[profile default]
region = us-east-1
output = json
The profile is named default in this case. It is possible that your profile uses another name. If so, please replace default with the name of your profile in the following.
To be able to assume a role with MFA you need to add the following snippet to your ~/.aws/config file. Replace $AccountNumber with your AWS account number, $IamRole with the name of the IAM role you created in step 3 and $MfaSerial with the ARN of the MFA device you created for the IAM user in step 2. You will be able to find the $MfaSerial if you open the IAM user in the Management Console searching for Multi-Factor Authentication Device.
[profile poweruser]
role_arn = arn:aws:iam::$AccountNumber:role/$IamRole
source_profile = default
mfa_serial = $MfaSerial
After you replaced the variables, the snippet should look similar to the following listing.
[profile poweruser]
role_arn = arn:aws:iam::111111111111:role/PowerUser
source_profile = default
mfa_serial = arn:aws:iam::111111111111:mfa/johndoe
5. Testing configuration
Everything is ready to be tested now. If you execute aws s3 ls --profile poweruser in your terminal the CLI will ask for your MFA code before it lists all S3 buckets.
You don’t need to re-enter the MFA token on every request. The temporary token is valid for 12 hours by default.
The AWS documentation contains more details about how to configure the AWS CLI to assume a rule and use MFA: Assuming a Role
Summary
It is possible to use multi-factor authentication when controlling AWS resources with the help of the CLI. The CLI supports MFA and assuming a role out of the box. This adds an additional layer of security: your AWS accounts won’t be compromised if someone can steal the AWS keys from your local machine.
