AWS Velocity Series: CI/CD Pipeline as Code
The Continuous Integration / Continuous Deployment pipeline is a major section of your software assembly line. It starts with the code repository and ends with the deployment into your production environment. CI/CD includes many steps that all depend on each other. That’s why this is a valuable area for automation.

The CI/CD pipeline does the following:
- runs on every commit into your repository
- updates itself if needed
- builds the source code
- executes unit tests
- packages the application as an artifact
- creates or updates the acceptance environment if needed
- deploys the artifact into the acceptance environment
- executes acceptance tests against the acceptance environment
- creates or updates the production environment if needed
- deploys the artifact into the production environment
That’s a lot of work. Luckily AWS can help us out.

- AWS CodeCommit is a managed source code repository service.
- AWS CodeBuild is a fully managed build server that can run anything you need to build and deploy your application within a container.
- AWS CloudFormation is the Infrastructure as Code service from AWS that can convert YAML or JSON templates into running infrastructure stacks.
- AWS CodePipeline is a managed service that glues all the above services together in a pipeline.
So what is your job?
- track your source code in a repository
- describe your pipeline as code
- write a script to build, test, and package application
- write a script to build, test, and package acceptance test
- describe your infrastructure as code
In this article, you will learn how to perform steps 1 to 4. The rest of this series focuses on step 5. In the end, you will be able to push an application to production without any manual work. That’s enough motivation to continue?
AWS Velocity Series
Most of our clients use AWS to reduce time-to-market following an agile approach. But AWS is only one part of the solution. In this article series, I show you how we help our clients to improve velocity: the time from idea to production. Discover all posts!
Let’s get started.
Setting up the git repository
To create an AWS CodeCommit git repository, make sure you have the AWS CLI installed. Execute the following command in your terminal:
export AWS_DEFAULT_REGION=eu-west-1 |
If you use AWS CodeCommit the first time, you need to upload your public SSH key to your IAM user and make sure that the IAM user has access right to CodeCommit. You can grant access to CodeCommit using the managed policy AWSCodeCommitPowerUser.
- Open the IAM Dashboard
- Click on your user
- Select the Security Credentials tab
- Click the gray Upload SSH public key button
- Insert your public key (mine is located at
~/.ssh/id_rsa.pub) - Click the blue Upload SSH public key button
- Copy the SSH key ID of your uploaded public key (e.g.
ASFKAAPNGA66RIIWSYMQ). - Select the Permissions tab
- Click the blue Add permissions button
- Select Attach existing policies directly
- Search for
AWSCodeCommitPowerUserin the table - Select AWSCodeCommitPowerUser
- Click the blue Next: preview button
- Confirm by clicking the blue Add permissions button
Now you initialize the git repository locally and push your changes to CodeCommit.
Make sure that you are in the project folder
aws-velocitythat you created in the previous part of the series.Run
git initRun
echo "node_modules/" > .gitignoreReplace
$YourSshKeyIdwith your SSH key ID and rungit remote add origin ssh://$YourSshKeyId@git-codecommit.eu-west-1.amazonaws.com/v1/repos/aws-velocity
Run
git add -ARun
git commit -m 'initial commit'Run
git push -u origin master
The source code is now available in AWS CodeCommit.
Describing the pipeline as code
AWS CloudFormation is the infrastructure as code service on AWS. You can also use CloudFormation to describe a pipeline. CloudFormation is based on templates in YAML or JSON. You will use YAML in the following example. The template has ~200 lines. I will present the template in pieces that you need to copy together to get the running version. Or you can download the file on GitHub.
The first part of the template describes some parameters that make the template reusable. It also contains the S3 bucket that is used to store the compressed artifacts. In the deploy folder, create a file pipeline.yml with the following content:
|
You also need some IAM roles to allow CodePipeline, CloudFormation, and CodeBuild to access your account. Add the following content to deploy/pipeline.yml:
PipelineRole: |
You will use CodeBuild to build, test and package the app and the acceptance test. This part also includes the scripts that are run when building, testing, and packaging your app. Add the following content to deploy/pipeline.yml:
AppProject: |
And finally the CodePipeline pipeline is described. The pipeline connects the dots. From repository, to pipeline update, to triggering the CodeBuild projects. Add the following content to deploy/pipeline.yml:
Pipeline: |
The Continuous Integration part of the pipeline is now done.
Make sure to commit the changes:
git add -A |
Now it’s time to create the pipeline. You only need to execute this command once; the pipeline will update itself in the future.
aws cloudformation create-stack --stack-name aws-velocity-pipeline --template-body file://deploy/pipeline.yml --capabilities CAPABILITY_IAM |
Creating the CloudFormation stack that contains the pipeline will take some time. Use the following to command to wait until the stack was created::
aws cloudformation wait stack-create-complete --stack-name aws-velocity-pipeline |
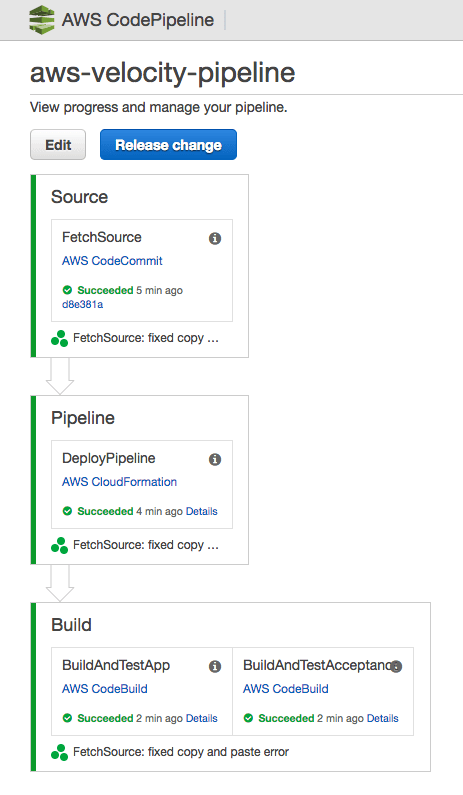
Open the AWS CodePipeline Dashboard, select the aws-velocity-pipeline pipeline and wait until all boxes are green.

Now, the Continuous Integration part of the pipeline is done. You can find a copy of the running app in the S3 bucket that starts with aws-velocity-pipeline-artifactsbucket-* under aws-velocity-pipelin/App. Download the compressed file, unzip it, and you will find a copy of your app.
Describing the infrastructure as code
In the rest of this series, you will learn how to describe the infrastructure as code. Depending on your target platform things vary. You can choose from:
- EC2 based app that runs in an Auto Scaling Group
- Containerized app that runs on ECS
- Serverless app
All resources that you created are part of the non-expiring AWS Free Tier. If you have no other pipelines running and do not use more than 100 minutes of build time, you will not be charged by AWS.
You can cleanup all the resources at the very end of this series (coming soon)
Series

- Set the assembly line up
- Local development environment
- CI/CD Pipeline as Code (you are here)
- Running your application
- EC2 based app
a. Infrastructure
b. CI/CD Pipeline - Containerized ECS based app
a. Infrastructure
b. CI/CD Pipeline - Serverless app
- Summary
You can find the source code on GitHub.
