Dockerizing Ruby on Rails
Did you dockerize your Ruby on Rails application already? You definitely should! Read on to learn why and how.
Shipping software is a challenge. Endless installation instructions explain in detail how to install and configure an application as well as all its dependencies. But in practice, following installation instructions ends with frustration: the required version of Ruby is not available to install from the repository, the configuration file is located in another directory, the installation instructions do not cover the operating system you need or want to use, etc.

And it gets worse: to be able to scale on-demand and recover from failure, we need to automate the installation and configuration of our application and its runtime environment. Implementing the required automation with the wrong tools is very time-consuming and error-prone.
But what if you could bundle your application with all its dependencies and run it on any machine: your MacBook, your Windows PC, your test server, your on-premises server, and your cloud infrastructure? That’s what Docker is all about.
In short: Docker is a toolkit to deliver software.
The most important part of the Docker toolkit is the container. A container is an isolated runtime environment preventing an application from accessing resources from other applications running on the same operating system. The concept of a jail - later called a container - had been around on UNIX systems for years. Docker uses the same ideas but makes them a lot easier to use.
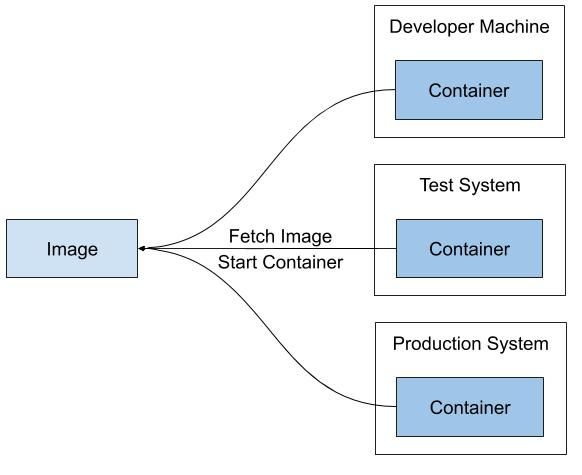
With Docker containers, the differences between different platforms like your developer machine, your test system, and your production system are hidden under an abstraction layer. But how do you distribute your application with all its dependencies to multiple platforms? By creating a Docker image. A Docker image is similar to a virtual machine image, such as an Amazon Machine Image (AMI) that is used to launch an EC2 instance. The Docker image contains an operating system, the runtime environment, 3rd party libraries, and your application. The following figure illustrates how you can fetch an image and start a container on any platform.

But how do you create a Docker image for your web application? By creating a script that builds the image step by step: a so-called Dockerfile.
Next, you will learn how to dockerize a typical Ruby on Rails application.
The project structure of a typical Ruby on Rails project looks like this:
├── Gemfile |
How to bundle an application with the described project structure? Let’s have a look at the Dockerfile:
- Based on Amazon Linux 2.
- Installs Node.js, required by yarn, required by Ruby on Rails.
- Installs Ruby and Ruby on Rails with all needed dependencies.
- Installs wait-for-it - a helper to make sure that the MySQL database is up and running before the Ruby container is started with
docker-compose. - Copies all files except the ignores defined in the file
.dockerignore. - Installs all Ruby dependencies of the application and generates the static assets.
- Configured a custom entry point that runs the database migrations when the container starts before the application is started.
- Exposes port 3000 and defines the default command to run the application.
FROM amazonlinux:2.0.20190508 |
To limit the amount of data that needs to be sent to Docker, the .dockeringore file defines an exclude list for files and directories that you typically do not need to include in the Docker image.
aws/* |
It is a best practice when dockerizing applications to use environment variables instead of configuration files. Do not use files to store the configuration for your application. Use environment variables instead. Luckily, Ruby on Rails comes with it’s own configuration mechanism that supports environment variables out of the box. Check out the file config/database.rb to see how environment variables are used to configure the database connection.
# ... |
One more thing: it is necessary to run the database migration each time you roll out a new version of your application. The easiest way to do so is to execute db:migrate each time you start the Docker container. To do so, the Dockerfile adds a so-called ENTRYPOINT which references the shell script custom-entrypoint. Each time you start the Docker container, the entry point script gets executed as well.
The custom-entrypoint script:
- Waits until it is possible to establish a database connection.
- Executes the database migration by calling
db:migrate. - Starts the
pumaweb server.
|
That’s it! You are ready to build a Docker image bundling your Ruby on Rails application.
docker build -t myapp:latest . |
Start a container based on the image …
docker run -p 3000:3000 myapp:latest |
… and open http://localhost:3000.
You have successfully dockerized your Ruby on Rails application. What is next?
- Push the Docker image into a private registry (e.g., Amazon ECR).
- Deploy your application in the cloud (e.g., with ECS and Fargate).
