How to dockerize your PHP application for AWS Fargate?
The biggest game-changer for Docker on AWS was the announcement of AWS Fargate. Operating Docker containers could not be easier. With AWS Fargate, you launch Docker containers in the cloud without any need of managing virtual machines.

All you need is a Docker image of your application. You will learn how to dockerize your PHP web application for the use with AWS Fargate in the following.
What is a Docker image?
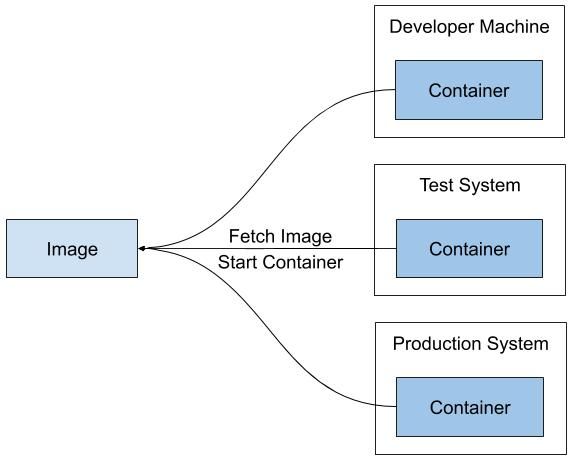
A Docker image is similar to a virtual machine image, such as an Amazon Machine Image (AMI) that is used to launch an EC2 instance. The Docker image contains an operating system, the runtime environment, 3rd party libraries, and your application. The following figure illustrates how you can fetch an image and start a container on any platform.

Two containers: NGINX and PHP-FPM
But how do you create a Docker image for your web application? By creating a script that builds the image step by step: a so-called Dockerfile.
Our example is a PHP application written in PHP without using any frameworks. The project’s folder structure:
confthe configuration directory (contains .ini files)cssthe stylesheet directory (contains .css files)imgthe images directory (contains .gif files)libthe libraries directory (contains .php files)index.phpthe main file
Add a docker directory containing the Docker configuration (e.g., the Dockerfile).
A typical setup to serve a PHP application consists of:
- A web server (for example NGINX)
- A PHP process (for example PHP-FPM)
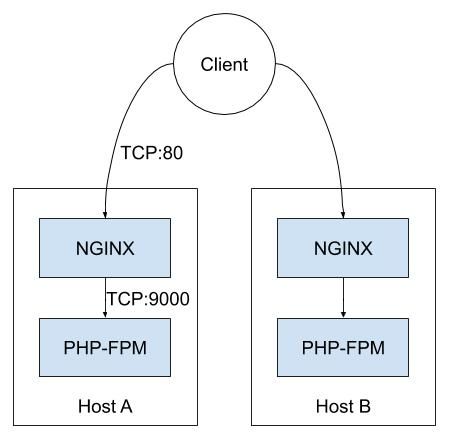
Therefore, we need to run two processes: NGINX and PHP-FPM. However, a container should only run exactly one process at a time. Which means we need to build two images. The following figure shows the two containers: the NGINX container receives the request from the client and forwards PHP requests to the PHP-FPM container. Both containers run on the same host to avoid additional network latency.

Building the NGINX image
Start with creating a Docker image for NGINX. NGINX serves the static files. In our example application, the static files are stored in the css and img directory already. On top of that, NGINX forwards PHP requests to PHP-FPM.
The following snippet shows the configuration file docker/nginx/default.conf which tells NGINX to serve static files from /var/www/html and forward PHP requests to PHP-FPM. You do not need to make any changes to the NGINX configuration when dockerizing your web application.
server { |
Next, you need a Dockerfile for building your own NGINX image. The following snippet shows the Dockerfile docker/nginx/Dockerfile that we created for our sample application.
The first instruction defines the base image. When creating an image, we don’t have to start from scratch. We can use a pre-built base image.
FROM nginx:1.14 |
The next instruction copies the NGINX configuration file from your disk to the Docker image.
COPY docker/nginx/default.conf /etc/nginx/conf.d/default.conf |
The next two instructions copy the css and img directories from your local disk to the NGINX root directory /var/www/html/ in the Docker image.
Depending on where you are storing the static files of your web application, you’ll need to modify these instructions accordingly. Make sure you are copying all static files to
/var/www/html/.
COPY css /var/www/html/css |
The next instruction runs the chown command to transfer ownership of all static files to the nginx user. The nginx user is part of the base image.
RUN chown -R nginx:nginx /var/www/html |
The Dockerfile is ready. It’s time to build your first image.
docker build -t php-basic-nginx:latest -f docker/nginx/Dockerfile . |
The following snippet explains the docker build command in more detail.
docker build => Docker command to build a new image |
The next step is building the PHP-FPM image. The following snippets show the Dockerfile docker/php-fpm/Dockerfile used by our sample application.
Building the PHP-FPM image
The first instruction defines the base image. We are using a base image with PHP 7.3 pre-installed for our sample application.
FROM php:7.3-fpm-stretch |
It is followed by enabling the PHP configuration optimized for production workloads and installing the PHP extensions pdo and pdo_mysql.
# PHP |
The following instructions copy the PHP files from your disk to the root directory of PHP-FPM.
When dockerizing your application, you will most likely need to modify these COPY instructions to make sure all PHP files are copied to the image. Also, as you add new PHP files to your application, make sure to add them to this list as well.
# Copy PHP files |
The following instructions tell Docker that PHP-FPM will expose port 9000 and start the PHP-FPM process by default. You do not need to change anything here.
# Expose and start PHP-FPM |
Next, use the docker build command to create your PHP-FPM image:
docker build -t php-basic-php-fpm:latest -f docker/php-fpm/Dockerfile . |
What’s next?
You have successfully built two Docker images: NGINX and PHP-FPM. The following steps are missing to start Docker containers based on your images with AWS Fargate.
- Push both images to a Docker registry (e.g., ECR).
- Create an ECS cluster.
- Create an ECS launch configuration.
- Create an ECS service.
